Affiliate Disclosure:This article contains affiliate links. If you purchase through our links, we may earn a small commission at no extra cost to you. We only recommend gear we've tested or would genuinely use ourselves.
how to • May 14, 2026 • 10 min read · The Bite Intel Team
DIY Fishing Kayak Setup: 7 Modifications That Cost Under $100 Total
Rig your fishing kayak with rod holders, anchor trolley, and fish finder for under $100. Step-by-step diy fishing kayak mods with specific products and prices.
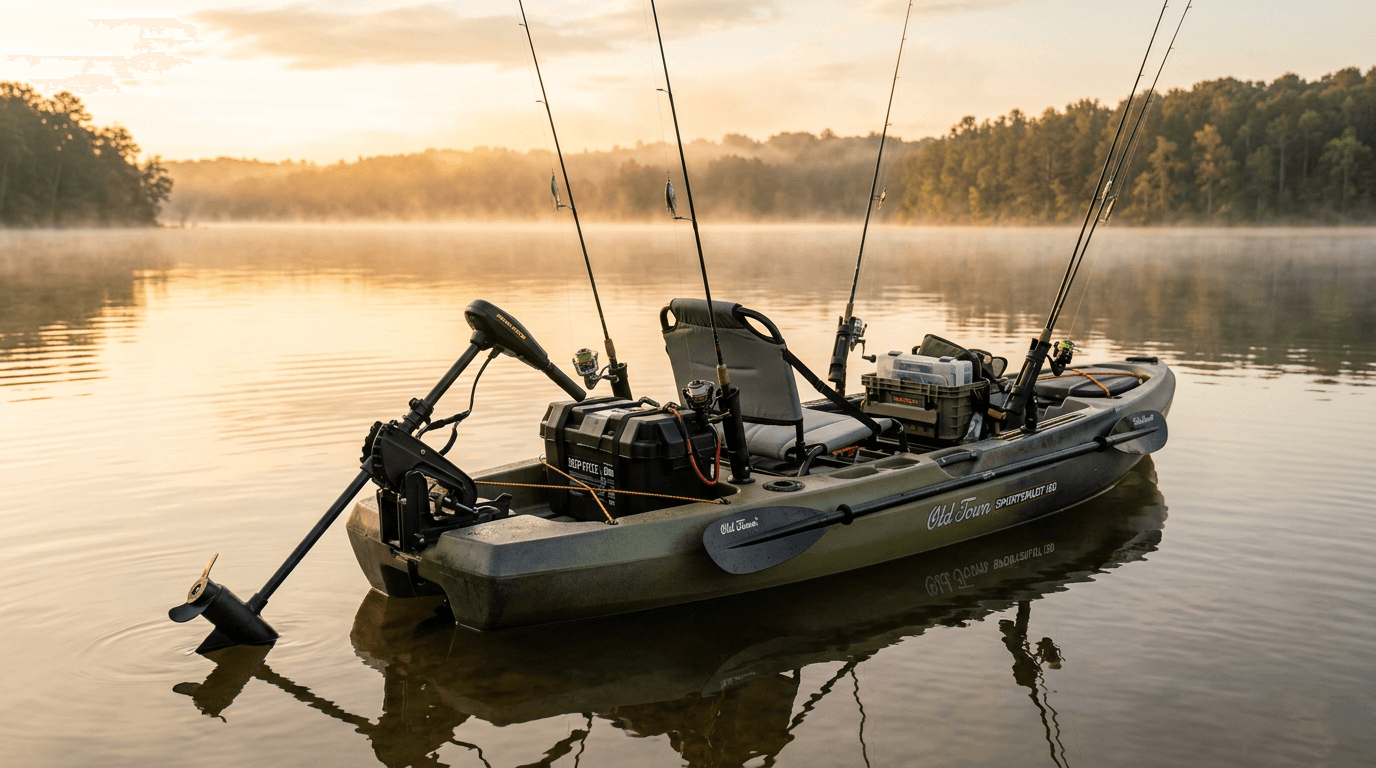
Most fishing kayaks leave the factory rigged for paddling, not fishing. The flush mounts are in the wrong spots. There's no rod storage. No anchor system. No way to run a fish finder cleanly.
A $700 bare kayak with $92 in smart modifications will out-fish a $1,500 pre-rigged model — because you put each piece exactly where you need it for your water.
This diy fishing kayak guide covers every mod in priority order: specific products, exact prices, and the total cost breakdown. We've rigged a lot of kayaks. Here's what we actually recommend.
Start Here — The One Mod That Changes Everything (Rod Holders)
Rod holders are the first mod on every kayak we rig. Without them, you're holding your rod while paddling, setting it across your lap, or leaning it against the hull where it slides into the water. None of that works.
You have three real options: no-drill gear track mounts, DIY PVC, or flush-mount drill-ins. Each has a right use case.
| Product | Rating | Price | Best For | Link |
|---|---|---|---|---|
| YakAttack Omega Rod Holder | 4.8/5 | ~$28/each | No-drill, quick-release, gear track kayaks | Check Price |
| DIY PVC Pipe Holder | 4/5 | ~$8–12 total | Budget builds, milk crate mounting | Check Price |
| Flush Mount Drill-In (RAM or YakAttack) | 4.5/5 | ~$15–20/each | Permanent install, clean deck look | Check Price |
The YakAttack Omega Pro (around $28) is the no-drill standard. It clips into any gear track — the molded rail that runs along the top of most sit-on-top kayaks — in about five minutes. No tools, no hull penetration, preserves your factory warranty.
Flush mounts are cleaner long-term but require drilling a 1.75-inch hole. We recommend waiting until you've paddled your kayak a dozen times before committing to drill positions.
DIY PVC is covered in the next section — it pairs specifically with the milk crate setup.
Check Price — YakAttack Omega Rod HolderWarning
Paddle clearance is the most common rod holder mistake. Mount nothing within 18 inches of your seat on either side at the 3 o'clock and 9 o'clock positions — that's your paddle arc. Holders placed there will shatter rod tips on every stroke.
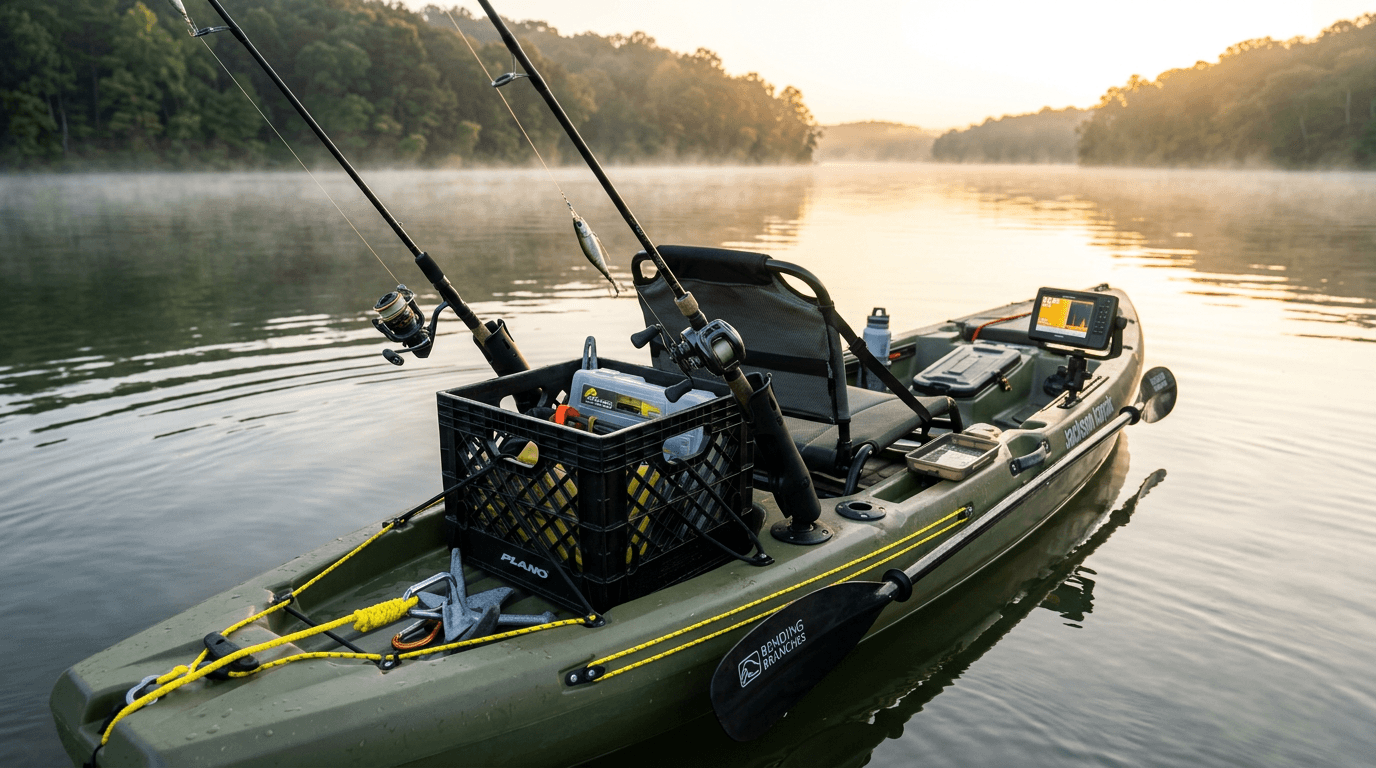
Rod and Tackle Storage: The Milk Crate Setup
A tank well is the recessed rectangular storage area at the stern of most sit-on-top kayaks. On a standard 12-foot kayak it runs roughly 14"×14" — sized almost perfectly for a standard milk crate.
The milk crate is the cheapest, most versatile storage upgrade in kayak fishing. A 4-gallon square milk crate fits the tank well of most 10.5-foot-and-longer sit-on-tops, sits stable without fasteners, and gives you a platform to mount PVC rod holders on all four sides.
What to buy:
- Standard 4-gallon square dairy crate (14"×14"×11") — widely available, or a purpose-made kayak crate
- Four 1.5-inch schedule 40 PVC pipe sections, 12 inches long — under $6 at any hardware store
- Eight zip ties or bungee cord to secure holders to crate walls
Why 1.5-inch PVC: It fits the grip diameter of nearly every spinning rod and most baitcasters. If you run oversized pistol grips, step up to 2-inch. Cut the pipe at a 30-degree angle on the top opening so rods seat at a comfortable angle rather than standing straight up.
To attach pipe to crate, drill two small holes through the crate wall at the mounting position, thread a zip tie through and around the PVC, cinch tight. No adhesive needed — it holds under fishing loads and disassembles in seconds.
Check Price — Kayak Fishing Crate + Mounting KitTip
Buy solid-corner crates only. The thin-walled injection-molded crates sold as "storage bins" crack at the corners under rod torque. True dairy-style crates with reinforced corner pillars handle it fine.
Anchoring Without Tipping Over (Anchor Trolley)
Anchoring directly off a bow cleat or side rail is how kayak anglers flip their boats. The moment current or wind catches the hull at an angle, the kayak rolls. An anchor trolley fixes this.
An anchor trolley is a simple loop of paracord or webbing that runs from bow to stern along one side of the kayak, with a carabiner clip at the working position. You clip your anchor line to the carabiner and slide it to the bow or stern — this keeps the anchor load pulling along the kayak's centerline regardless of current direction. No sideways pull, no tipover risk.
DIY anchor trolley for under $10:
- 10 feet of 550 paracord — $3
- Two pad eyes (stainless screws into hull at bow and stern) — $4
- One small carabiner — $2
The only downside is the two screw holes. If you'd rather keep the hull factory-sealed, a kit version uses existing screw holes or hardware you already have.
Check Price — YakGear Deluxe Anchor Trolley Kit (~$30)Warning
Never clip your anchor line directly to a side rail, handle, or grab loop. These attachment points are not rated for anchor loads and are positioned to create exactly the sideways pull that flips kayaks. Always run anchor load fore or aft through a trolley system.
Running a Fish Finder Without Drilling the Hull
Hull penetration — drilling through the bottom to run a transducer cable — is permanent and voids most factory warranties. You don't need to do it.
A scupper mount transducer bracket attaches to one of the existing scupper holes (the drain holes molded into the hull floor of every sit-on-top kayak). RAM Mounts makes a universal scupper transducer mount that fits Humminbird, Lowrance, and Garmin transducers. It takes five minutes to install with no tools. The transducer hangs below the hull in clean water, reads bottom accurately, and removes in seconds.
Routing the cable without drilling: Run the transducer cable up through the same scupper hole, across the deck under the bungee rigging (the elastic cord already molded into most kayak decks), and to your fish finder head unit. Use small adhesive cable clips to keep it from catching on anything. The whole run stays above the waterline and is fully reversible.
For screen size, 5 to 7 inches is the practical sweet spot on a kayak. Larger screens eat mounting real estate and catch wind. Smaller than 5 inches is hard to read in bright sunlight.
Check Price — Lowrance Kayak Scupper Transducer Mount (~$25)Tip
Stick with a transducer rated for your specific fishfinder brand. Universal mounts work with any fishfinder — but you still need the OEM transducer for your unit. Mixing brands degrades depth accuracy significantly.
Cheap Mods That Make a Real Difference (Under $15 Each)
These four additions cost almost nothing and solve problems you'll hit on your first trip.
Paddle leash (~$8): A coiled leash that clips your paddle to the kayak. When you set the paddle down to fight a fish, it doesn't drift away. Every kayak angler loses a paddle at least once before they buy one of these.
Check Price — Kayak Paddle LeashBungee deck rigging (~$10): Pre-made bungee cord kits with stainless deck screws. Adds above-deck storage for landing nets, tackle bags, or a dry bag without taking up tank well space. Install six points in a grid pattern for maximum flexibility.
Check Price — Kayak Bungee Deck Rigging KitNon-slip foam padding (~$12): Peel-and-stick closed-cell foam sheet cut to fit the cockpit floor and seat area. Keeps gear from sliding when you lean. Also quieter — tackle boxes and crates won't rattle against bare plastic. EVA foam from yoga mat material works identically and costs even less.
Check Price — Kayak Non-Slip EVA Foam PaddingWaterproof phone mount (~$15): A RAM Mount or similar handlebar-style clamp that fits the kayak's side rail. Keeps your phone accessible for GPS, fishing apps, and photos without it sitting loose in your lap. Buy one rated waterproof — not just water-resistant — for kayak use.
Check Price — RAM Mount Waterproof Phone HolderWhat Your Complete DIY Setup Should Cost
Here's the full itemized breakdown. The budget column ($92 total) is the true sub-$100 build — every mod works, nothing is premium. The recommended column is what we'd actually buy starting fresh; it runs $188, but that still beats the $300–400 a pre-rigged factory kayak adds for the same hardware in worse positions.
| Modification | Budget Price | Recommended Price |
|---|---|---|
| Rod holders (2× DIY PVC on crate) | $8 | $56 (2× YakAttack Omega) |
| Milk crate + mounting kit | $15 | $25 |
| Anchor trolley | $9 (DIY) | $30 (kit) |
| Scupper transducer mount | $20 | $28 |
| Paddle leash | $8 | $10 |
| Bungee deck rigging | $10 | $12 |
| Non-slip foam | $10 | $12 |
| Phone mount | $12 | $15 |
| Total | $92 | $188 |
Either way, you're well ahead of factory pricing.
Start with rod holders and the milk crate. Those two mods solve 80 percent of fishing-from-a-kayak frustrations. Add the anchor trolley before your first river trip. Everything else builds from there.
Frequently Asked Questions
Can I add rod holders to a kayak without drilling?
Yes. Gear track mounts like the YakAttack Omega Pro clip directly into the molded rails on most sit-on-top kayaks — no drilling, no tools, about five minutes to install. They run around $25–30 each and preserve your hull warranty. If your kayak doesn't have gear tracks, the milk crate PVC method requires zero hull modification either.
What PVC diameter fits standard fishing rod handles?
1.5-inch schedule 40 PVC fits the grip section of most spinning rods and standard baitcasters. For oversized pistol grips or heavy-duty casting rods with thick foam handles, step up to 2-inch. When in doubt, bring a rod to the hardware store and test fit before buying pipe.
Will a standard milk crate fit my kayak's tank well?
Most sit-on-top kayaks 10.5 feet and longer have a tank well measuring 14 inches square or larger. A standard 4-gallon dairy crate (14"×14"×11") drops right in. Compact kayaks under 10 feet often run smaller wells — measure yours before ordering. A crate that's even half an inch too wide won't drop level and will rock under load.
Do I need to drill to run fish finder wires?
No. A scupper-mount transducer bracket uses an existing drain hole in the hull floor — zero new penetrations. Route the cable up through the same scupper and under your deck bungees to the head unit. The entire installation is reversible, leaves no marks, and doesn't void your warranty.
Related Posts
How to Add a Trolling Motor to a Kayak: Complete Installation Guide
Learn how to add a trolling motor to a kayak step-by-step, including thrust sizing, mount types, wiring, battery selection, and state registration rules.
Inshore Kayak Fishing Tips for Beginners: 12 Things Nobody Tells You First
Inshore kayak fishing tips for beginners covering tides, tackle, conditions, and self-rescue so your first saltwater trip doesn't end in frustration.
Fishing Kayak Set Up: 9 Rigging Essentials (in the Order You Actually Need Them)
Complete fishing kayak set up guide with priority order, specific product names, and real prices. Budget setup ~$151, full rig ~$456.